

While dedicated developers of SCSM already know what’s what when it comes to developing for Service Manager - many an onlooker have no doubt stumbled across Travis Wright’s blogpost “Creating a Custom Administration Setting” on TechNet. In it, a primer on creating your very own truly custom management pack not only with some properties you could define, but a walkthrough of building a new Settings pane within the console, and then surfacing those properties in a way that can be edited through the SCSM Console with a custom UI. Truly the icing on any management pack cake for SCSM.
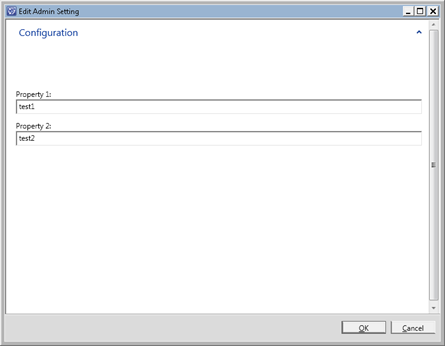
As Travis says “Start with the End in Mind” and shortly after this intro of his you immediately begin to get a taste of what this tutorial will offer in just two screenshots.
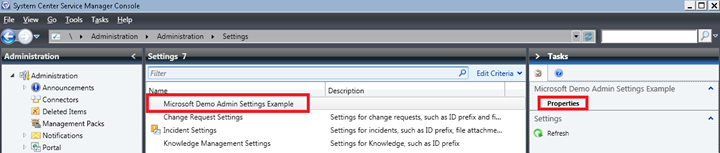
Regardless of the fact we see SCSM 2010 screenshots, conceptually what we’re doing shouldn’t really be all that different and truth be told it isn’t. But it’s when we hit the Implementation section of the post, we’re immediately thrown into code and if you don’t know what you’re looking at you already may be lost. Not to mention, the article hasn’t really maintained a great sense of formatting over the years so it’s hard to see all of the code in a single glance. Next, you can’t just copy and paste the entire page as is into something and even if you could. Where would it go? Finally, the link Travis provides to downloading a copy of the solution has since gone missing.
What I’ll be covering in a series of upcoming posts is using Travis’ original article as a driving force behind creating my own management pack for the SMLets Exchange Connector and no less for the identical purpose originally described - I want a single, persistent location that maintains settings so if you make use of the connector you’ll be able to upgrade it without having to constantly re-adjust settings with every patch. What’s more, I’ll be detailing every step of the process to show you how the MP was constructed, how you can do it yourself, and of course how you can continue to modify the SMLets Exchange Connector should you so choose.
Finally, with this blog post being hosted on GitHub it gives you the reader the opportunity to provide feedback directly into this post by creating Forks and Pull Requests from your own GitHub account. So if you see something you’d like written cleaner, tips that you think would be helpful to others, or just want to give a Star on the repo for thanks then please: sign up for GitHub!
Here’s a crude diagram of what we’re about to build
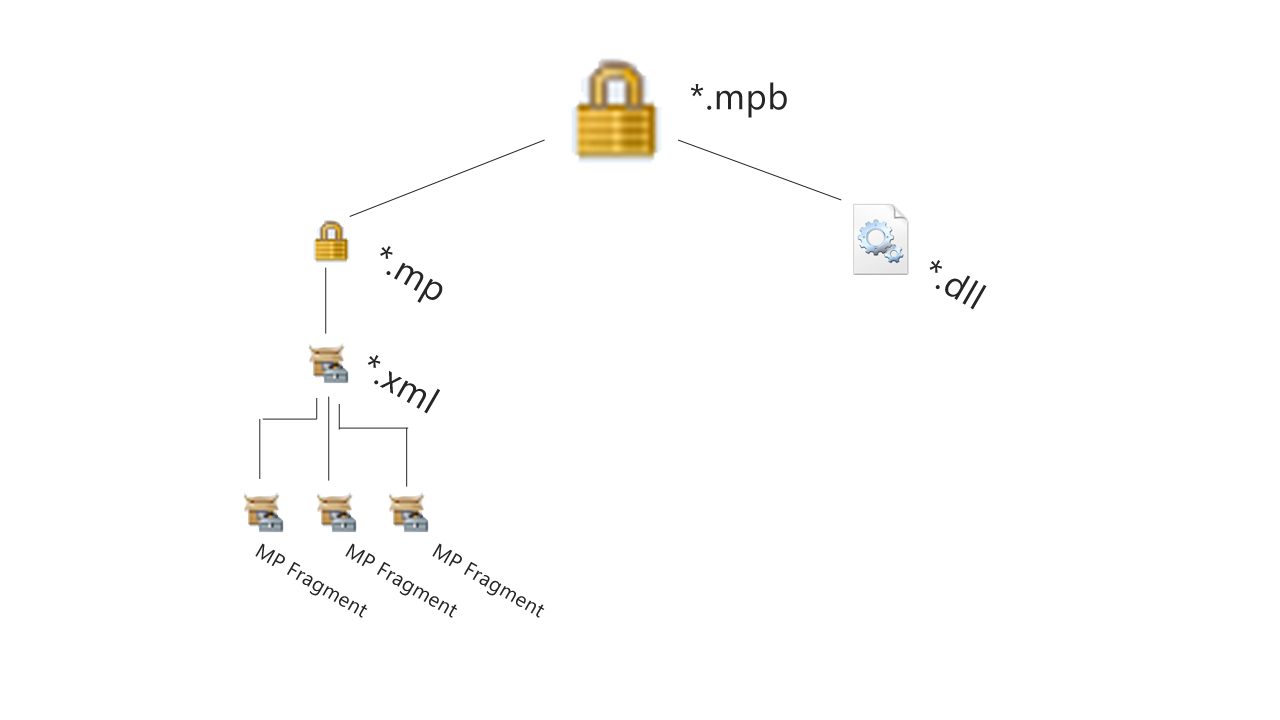
We’re going to use Visual Studio to ultimately assemble a Management Pack Bundle (MPB) file. It’s going to contain everything we need to have a custom Settings pane.
Pre-requisites. You’ll need the following:
- Visual Studio
The free community edition will do so long as the version you have is one of the following 2017/2015/2013/2012 - Visual Studio Authoring Extensions (VSAE)
https://www.microsoft.com/en-ca/download/details.aspx?id=30169 - Service Manager Authoring Tool
https://www.microsoft.com/en-us/download/details.aspx?id=54059
While the Authoring Tool provided by Microsoft gives most of us the ability to make simple modification such as Class Extensions or Form Customizations. VSAE gives us is the ability to build management packs inside of Visual Studio using all of the power of Visual Studio for what is generally reserved as a truly dedicated developer tool. However we’ll need the Authoring Tool as it makes some MPs and MPBs available that we’ll need for VSAE. Make no mistake SCSM Administrators, you’re about to cross the development bridge here not only with the use of Visual Studio but a wholly new way to truly construct management packs from scratch.
Get both of these items installed and fire up Visual Studio. No looking back. Let’s do this!
Getting Started
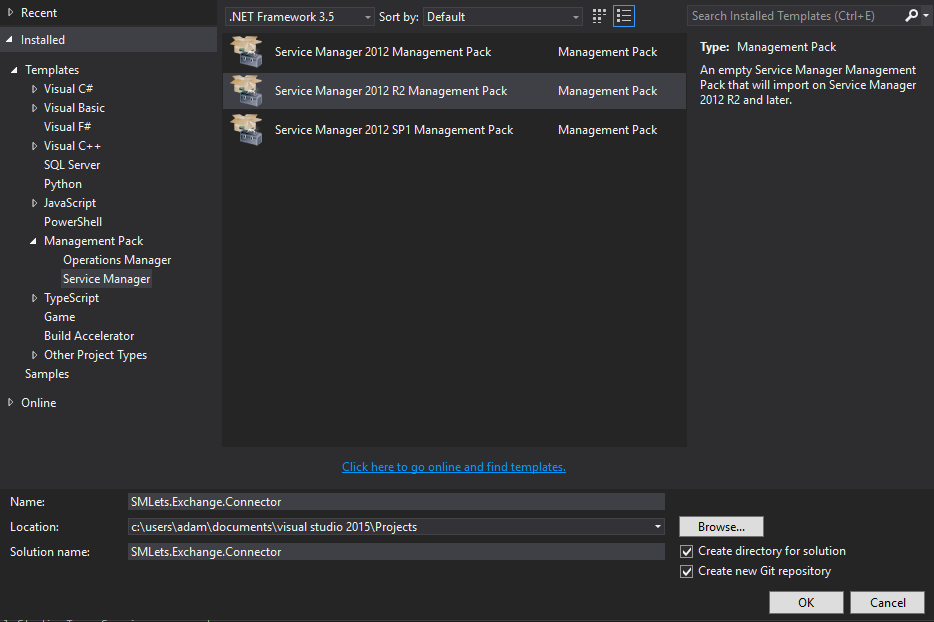
Let’s create a New Project of the Management Pack variety for Service Manager 2012 R2 and make sure we target the .NET Framework 3.5 (if you’re using SCSM 2016 you’ll need to target .NET 4.5.1). I’ve decided to name my Visual Studio project the same name I’m going to end up with for my management pack so I’ll be using SMLets.Exchange.Connector
Once created, we’ll be dropped into a fairly blank looking canvas of sorts. Let’s expand this project of ours out and see what things look like.
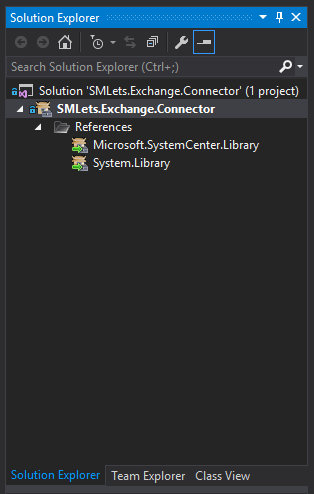
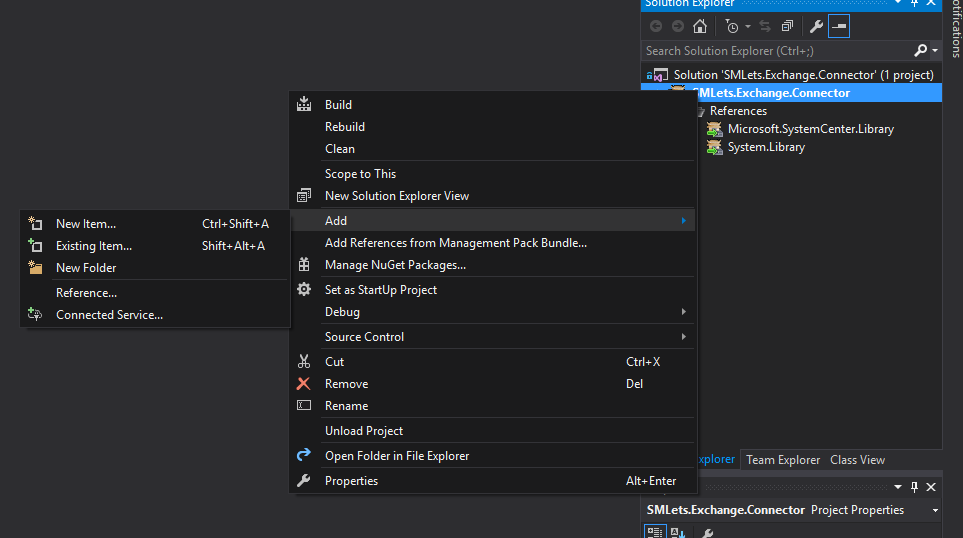
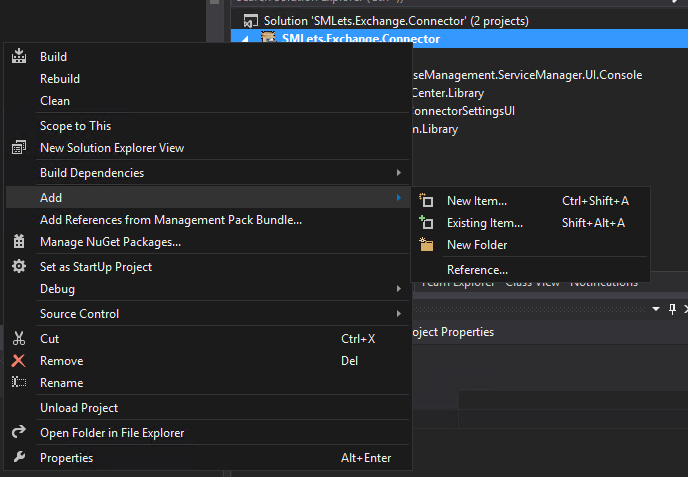
What we have here is the Visual Studio project/solution for what our Management Pack will ultimately be built from (i.e. the source code). We don’t have much to start out of the gate, so to get this project moving we’ll need to add a new Management Pack Fragment. This can be done by right clicking on the name of the project (SMLets.Exchange.Connector) in this case, navigating to Add and then New Item.
We’re then presented with the following window. I’m going to create a New Empty Management Pack Fragment and call it Settings.mpx
Q: What’s a Management Pack Fragment?
A: If you’ve ever exported a Sealed Management Pack from either SCOM or SCSM, you’ve ended up with an XML file that contained all of the definitions for things like overrides, templates, dependent management packs, etc. In reality, you’ve been seeing the end result of an assembled Management Pack. An MP Fragment is fairly akin to what the name suggests - it’s a part of a larger whole of that final raw XML. You can have as many Fragments in your project as you want because when Visual Studio is done and ready to deploy, it will automatically pull of those individual Fragments together to form a single Management Pack XML file. Then it gets signed/sealed with a key and converted to the XML’s binary representation aka the .MP file
Q: Couldn’t I just have a single fragment that contains everything and in effect have a final XML file of sorts?
A: Sure you could. But from a long term code management perspective it may be more difficult to maintain. By keeping fragments…well fragmented…and then compiled when Visual Studio builds you can ease your future administration of the project.
With my new Settings.mpx file I’m now presented with an editor for said new file (Settings.mpx)

Once again - it’s a starting point but entirely useless because if you’re like most people you don’t just happen to have the entire MP XML Schema committed to memory. This however is exactly where Travis’ first section of code comes into play. I’ve taken the liberty of copying what Travis originally wrote and reformatting it to make it more copy and paste friendly. BUT don’t get copy happy just yet!
<ClassType ID="Microsoft.Demo.AdminSetting.Example"
Accessibility="Public"
Abstract="false"
Base="AdminItem.Library!System.SolutionSettings"
Hosted="false"
Singleton="true"
Extension="false">

	<Property ID="Property1"
	Type="string"
	AutoIncrement="false"
	Key="false"
	CaseSensitive="false"
	MaxLength="256"
	MinLength="0"
	Required="false"
		/>

	<Property ID="Property2"
	Type="string"
	AutoIncrement="false"
	Key="false"
	CaseSensitive="false"
	MaxLength="256"
	MinLength="0"
	Required="false"
		/>
</ClassType>
While the above is what we need to get started you actually can’t just copy and paste this right between the lines we have above in our blank MP Settings fragment per his post. In fact, there is a slightly larger picture we don’t see in the above code snippet. The following is what we’re really looking to copy and paste directly inside of our new empty Management Pack Fragment. While you’re copying and pasting it’s worth drawing your attention to two lines that have become modified. If you’ve worked with the popular community driven SMLets PowerShell Module before, a class name are things like System.WorkItem.Incident or System.WorkItem.ChangeRequest. This is no different! SMLets.Exchange.Connector.AdminSettings.Definitions in this case is the name of our class. The fundamental difference is this new class of ours doesn’t spawn objects (such as IR1, IR2, IR3, etc.) instead it’s just a definitions class of sorts. In fact it’s a Singleton class. Travis no less spells this out himself:
First we need to create a management pack with our new Admin Setting class in it. If we derive from System.SolutionSettings our item will automatically show up in the Settings view. Further, since we aren’t going to be creating multiple instances of this class we should set it to Singleton=”true”. For this demo, I’m adding a couple of basic properties creatively named Property1 and Property2.
Sounds great Travis! Property1 and Property2 it is!
  <TypeDefinitions>
    <EntityTypes>
      <ClassTypes>
        <ClassType ID="SMLets.Exchange.Connector.AdminSettings.Definitions"
              Accessibility="Public"
              Abstract="false"
              Base="SAL!System.SolutionSettings"
              Hosted="false"
              Singleton="true"
              Extension="false">

          <Property ID="Property1"
          Type="string"
          AutoIncrement="false"
          Key="false"
          CaseSensitive="false"
          MaxLength="256"
          MinLength="0"
          Required="false"
		            />

          <Property ID="Property2"
          Type="string"
          AutoIncrement="false"
          Key="false"
          CaseSensitive="false"
          MaxLength="256"
          MinLength="0"
          Required="false"
		            />
        </ClassType>
      </ClassTypes>
    </EntityTypes>
  </TypeDefinitions>
But wait! There is a gotcha here. Because while you can copy and paste what about that whole “derive from System.SolutionSettings” Where does it actually come from? After all, we need it to get an item to appear in the Administration ->Settings pane and we seemingly need this thing to do it. So what is it? It’s a Management Pack from Microsoft that we’ll need so as to assemble ours and make sure it appears in the Settings pane. If this sounds like a “management pack dependency” it is! But where do we get it and how do we add it? Well, while we’re here let’s grab another one we’re also going to need for this project.
Microsoft.EnterpriseManagement.ServiceManager.UI.Console
System.AdminItem.Library
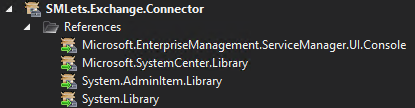
These are both found in the installation directory for Service Manager. Just right click on references and browser over to them. Once we add them both to the References folder of our project, let’s select System.AdminItem.Library. Then in the lower right hand corner of your Visual Studio screen let’s make sure we have SAL set as the Alias for this Microsoft MP.
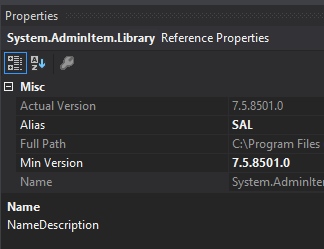
This is the same SAL we reference above in our management pack for Base=”SAL!System.SolutionSettings”
So rather than having to type the full name out of the Management Pack to reference, we can alias, then use that alias in our MP Reference section. This also is the basis for management pack dependency. What this means is you can’t import your new MP if these other MPs don’t exist. Since we’re referencing stock Microsoft SCSM MPs you can count on them being there for every SCSM deployment out there.
As Travis goes on to say:
Then we need to define a console task handler so that when the user clicks the Properties link in the task pane our form will come up. Notice how the task is targeted at our singleton class. It will call the class in the referenced assembly which I’ll show you in a minute.
This is where we start laying the foundation within the MP Fragment XML to make it so then when you double click or hit the “Edit” button the Settings item, that we’ll call the code to launch a GUI. In other words, we’re laying the ground work for a Click Event. But once again, we can’t just do a simply copy and paste of his XML. It in fact needs to get wrapped into a brand new Presentation group as seen below.
<Presentation>
  <ConsoleTasks>
    <ConsoleTask ID="SMLets.Exchange.Connector.AdminSettings.Edit" Accessibility="Public" Enabled="true" Target="SMLets.Exchange.Connector.AdminSettings.Definitions" RequireOutput="false">
      <Assembly>Console!SdkDataAccessAssembly</Assembly>
      <Handler>Microsoft.EnterpriseManagement.UI.SdkDataAccess.ConsoleTaskHandler</Handler>
      <Parameters>
        <Argument Name="Assembly">SMLetsExchangeConnectorSettingsUI</Argument>
        <Argument Name="Type">SMLetsExchangeConnectorSettingsUI.AdminTaskHandler</Argument>
      </Parameters>
    </ConsoleTask>
  </ConsoleTasks>
</Presentation>
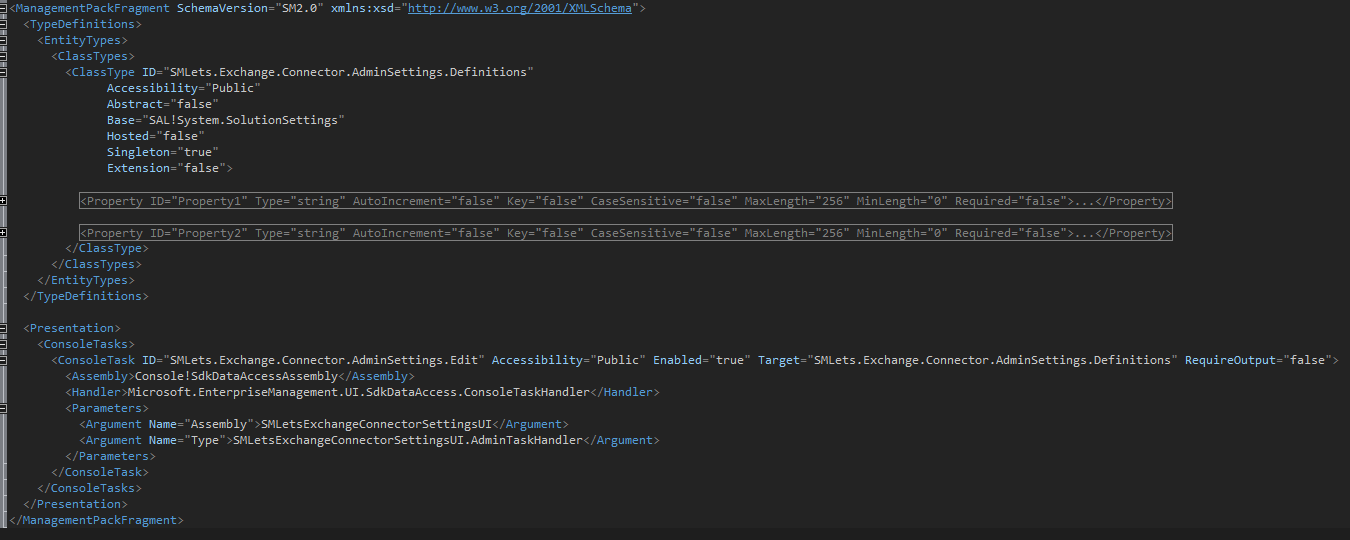
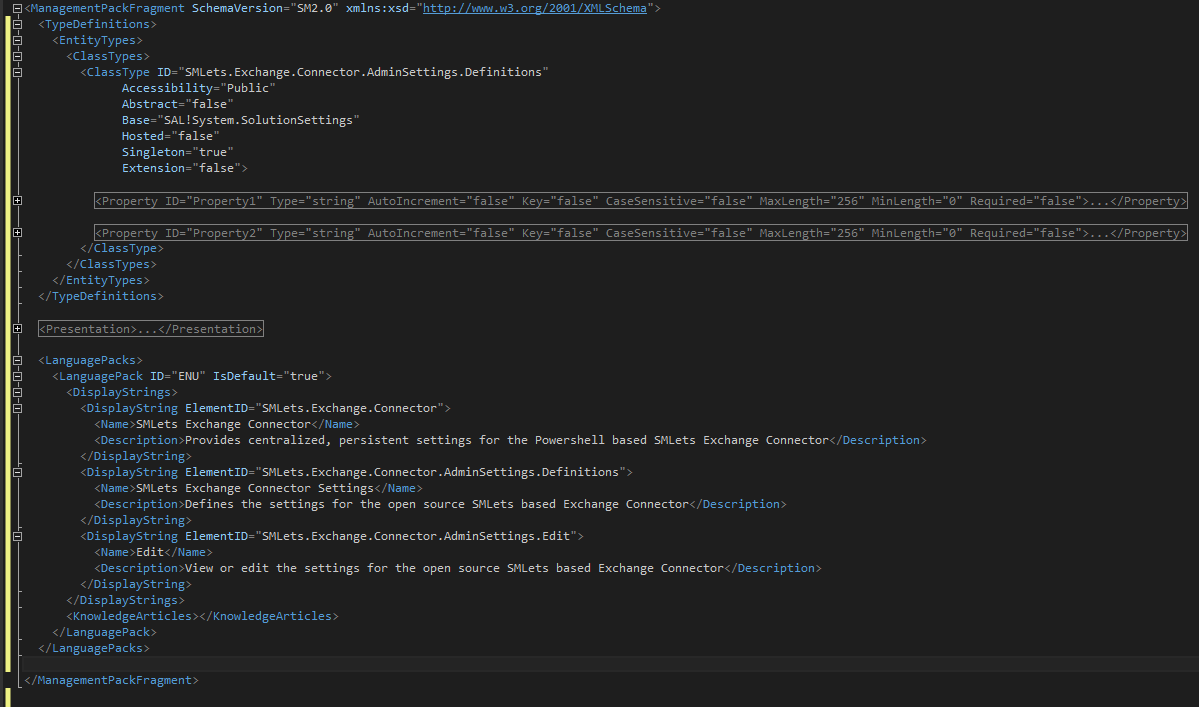
Your Management Pack Fragment should now look like the following. We have the previously set Type Definitions area that includes the two new properties we’re creating (you’ll notice I’ve simply collapsed the Properties just to make this screenshot look a little cleaner) and then beneath that a new section that contains the Console Task to perform a click event/action. While we’re here, let’s go over what’s happening in the Presentation section that we just copied from above.
We have a single presentation section.
It contains one or many Console Tasks.
Each Console Task must be uniquely identified (the ID parameter), whether or not the Task is Enabled, and finally what the Task’s Target Class is. To further break down the last part “Task’s Target Class” - if you were to go make a Task in the SCSM Console right now the first question SCSM asks you is “What class are you targeting?” If you were to pick Incident then the task you create will show up on all Incidents as a Task on the right hand side in those Forms/Views. This is fundamentally no different. We need a Task that targets the Class that we’ve just invented above in the ClassType section. The only difference here is we are now the author of the Class and the Task.
After this we move into the Assembly, Handler, and respective parameters. The first two - Assembly and Handler are stock Microsoft pieces that we’ll need to move forward. The next two sections will be our custom code that we’ll wrap inside of the MPB, one is a reference to the DLL we’ll eventually create and the second is a reference to a specific action within our custom DLL.
But let’s stick to the script of Travis’ post:
Then we need to define a console task handler so that when the user clicks the Properties link in the task pane our form will come up. Notice how the task is targeted at our singleton class. It will call the class in the referenced assembly which I’ll show you in a minute.
And this whole presentation section may have you wondering…
Q: Wait a second. Before you go any further, is the Presentation section where things like icons get added? Can we do that?
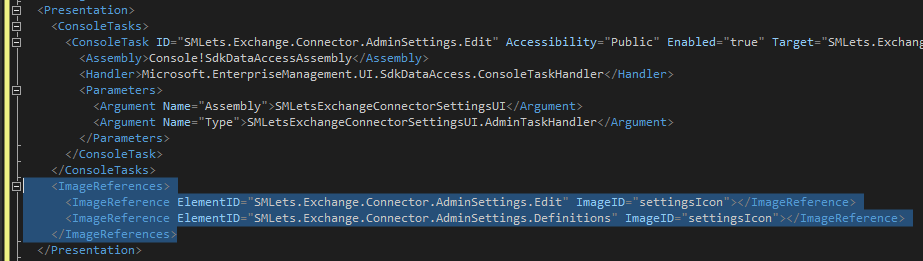
A: It is! And I wouldn’t mind adding some icons for the SMLets Exchange Connector settings so let’s make that happen. Let’s add some new MP XML and import some images into our Visual Studio project.
    <ImageReferences>
      <ImageReference ElementID="SMLets.Exchange.Connector.AdminSettings.Edit" ImageID="settingsIcon"></ImageReference>
      <ImageReference ElementID="SMLets.Exchange.Connector.AdminSettings.Definitions" ImageID="settingsIcon"></ImageReference>
    </ImageReferences>
But where exactly does this new section go? Right beneath the ConsoleTasks but right before we close off the Presentation section. See below:
Now let’s right click on the name of our project. Add. New Folder. Then to keep things simple, let’s just call the folder “Images”.
Now that we have a folder for pictures we can use same right-click technique but this time on the folder and add an Existing Item. Then you can use File Explorer to browse for the photo you want. Here’s however why I would suggest you don’t browse to somewhere else on your hard drive. Instead, open up where you saved the original Visual Studio project to. Then locate the recently created Images folder you just created. Copy photos into this directory. That way you can keep not just the management pack, but all of the photos, and other things that make up this project together. We’ll still use the File Explorer to browse, but instead of going somewhere else on your drive you can browse to the local folder than contains all of the work you’ve been doing so far so you can always find your related resources. Again - the name of the game here is grouping all of your items together in a single packagable group of folders.
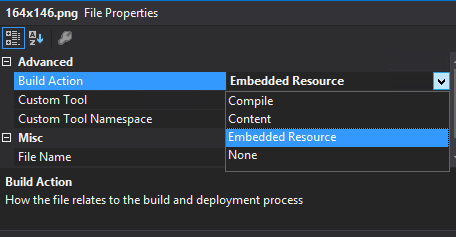
But we’re still not done with images here. Because even once you add them by default they won’t get wrapped up into our management pack (*.mpb) at the end. So in order to ensure this happens we’ll need to change a single setting on each individual photo and that’s the Build Action to ensure the photo is marked as an Embedded Resource. In doing so we’re instructing Visual Studio that these photos need to be converted to their binary representation when the sealing/conversion occurs in our XML to MP file.
Next, Travis says we need to add some Categories. I’m going to use the Categories that I need for this MP of mine but modeled off of his example. Just keeping his verbiage exact because it’s just as applicable and relevant to share here.
<Categories>
  <Category ID="Category.DoubleClickEditAdminSetting" Target="SMLets.Exchange.Connector.AdminSettings.Edit" Value="Console!Microsoft.EnterpriseManagement.ServiceManager.UI.Console.DoubleClickTask" />
  <Category ID="Category.SMLets.Exchange.Connector" Value="Console!Microsoft.EnterpriseManagement.ServiceManager.ManagementPack">
    <ManagementPackName>SMLets.Exchange.Connector</ManagementPackName>
    <ManagementPackVersion>1.0.0.34</ManagementPackVersion>
    <ManagementPackPublicKeyToken>446c13d5880992f3</ManagementPackPublicKeyToken>
  </Category>
</Categories>
In Travis’ own words:
The first one tells Service Manager that when the singleton class object is selected in the Settings view that the doubleclick task is the one defined in this management pack.
The second one tells Service Manager that this is an MP intended to be used in Service Manager. This is necessary to make sure that the console task shows up in the Service Manager console.
It’s worth pointing out here that the ManagementPackPublicKeyToken that is in bold above is absolutely something you need to be aware of when creating your own management packs with your own signing keys. Don’t have signing keys? Don’t know how to get the public token? I already know what you’re thinking, so let’s go create some keys and retrieve the public key we’ll ultimately need to place in this above Categories section.
On the same computer you have Visual Studio installed on, you’ll also have a new tool call Visual Studio command prompt. Just open up your Start Menu and type “prompt” and you should see the following options where YEAR is the Year Version of Visual Studio you have installed.
VSYEAR x86 Native Tools Command Prompt
VSYEAR x64 Native Tools Command Prompt
I’ll be going with the x64 version and making sure sure I “Run as Administrator”. Then I’ll use the following syntax to create a keypair in my C:\temp directory.
sn -k c:\temp\myKeyPair.snk
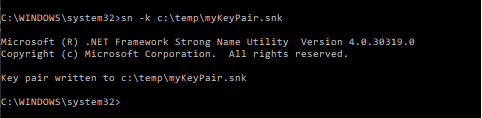
This is fairly straightforward. Just like PowerShell, we’re simply feeding this command prompt and the associated SN program that is part of the Visual Studio installer the needed parameters to execute. A public/private keypair is generated and then saved out to the folder path specified. But I said public/private keypair. PAIR. PAIR. I’m emphasizing this intentionally. The SNK is a single file representing both of those keys. Don’t forget that our management pack XML needs the public side of this pair. More specifically it needs the public token. So how do we extract the public token from the public/private keypair file we just generated? Just a two more commands here so I hope you didn’t close VS Command Prompt just yet.
sn -p c:\temp\myKeyPair.snk c:\temp\myNewPublickey.pubkey
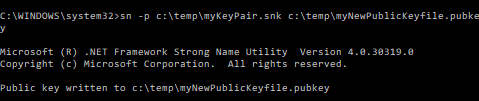
What we’ve done here is extract the binary public key from the binary public/private keypair and save it to a file. Now this said, the file extension DOES NOT matter. Simply just trying to keep things obvious here. Just one more command and we’ll be done.
sn -tp c:\temp\myNewPublicKeyfile.pubkey
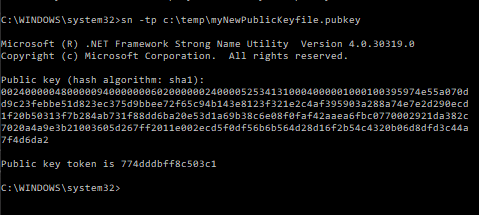
The “Public key token is” is the line that provides the value we’re looking for. FINALLY! This is what we can drop into
<Categories>
  <Category ID="Category.DoubleClickEditAdminSetting" Target="SMLets.Exchange.Connector.AdminSettings.Edit" Value="Console!Microsoft.EnterpriseManagement.ServiceManager.UI.Console.DoubleClickTask" />
  <Category ID="Category.SMLets.Exchange.Connector" Value="Console!Microsoft.EnterpriseManagement.ServiceManager.ManagementPack">
    <ManagementPackName>SMLets.Exchange.Connector</ManagementPackName>
    <ManagementPackVersion>1.0.0.34</ManagementPackVersion>
    <ManagementPackPublicKeyToken>446c13d5880992f3</ManagementPackPublicKeyToken>
  </Category>
</Categories>
Now it may go without saying, but I punched up this documentation after the fact so those keys very clearly do not match. Don’t worry I’ll be including a keypair with the Visual Studio solution when I publish it (on the next post/the repo itself) so you don’t have to go through this yourself. This is 100% if you’re interested in either swapping with your own keypair or you’re just reading this tutorial as a means to develop your own MP.
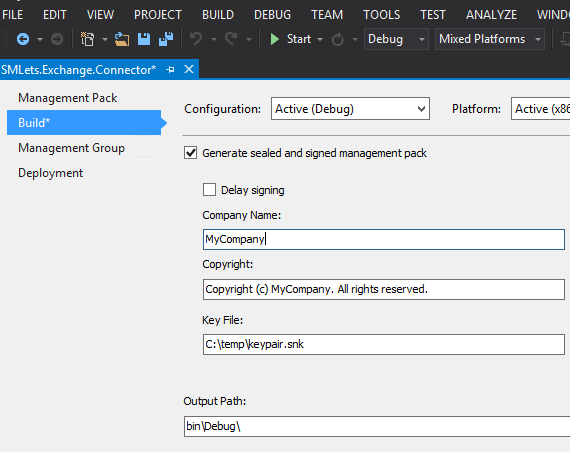
With our new keypair file, we can also tell Visual Studio to use said keypair in the signing of the MP during build. By heading into the Project and Settings pane. We can even configure the management group if we’d like our MP to auto-deploy on successful build through the Management Group tab. In lieu of this, the MP will just get built to the output path.
Keypair stuff is out of the way. Forward! Travis then goes onto say:
then we need the usual language pack stuff
Once again - if you’ve never seen it, it’s probably not all that usual to you. But what does the Language Pack section do? The responsibility of the Language Pack section as you might guess is to translate the Management Pack into different languages depending on where it gets deployed. Remember all of the “ID” parameters we’ve set so far? You know, all of those incredibly unique IDs? The Language Pack section locates the referenced ID and replaces it with a friendly Display String for you to see in SCOM/SCSM. Just take a look at the Language Pack section below. You’ll see that within the Language Pack section, we first define a Language Pack ID (ENU = English) followed by the translations of what Element goes to which language. This initial language code is the thing that tells SCSM/SCOM when you change the console language how to flip the respective settings for each and every single management pack. It also is how the SCSM DW understands how to change the reporting language and why if you’ve ever written reports against the DW you’ve had to specify a Language Code when doing your JOINS against the DisplayStrings table. I digress.
<LanguagePacks>
<LanguagePack ID="ENU" IsDefault="true">
<DisplayStrings>
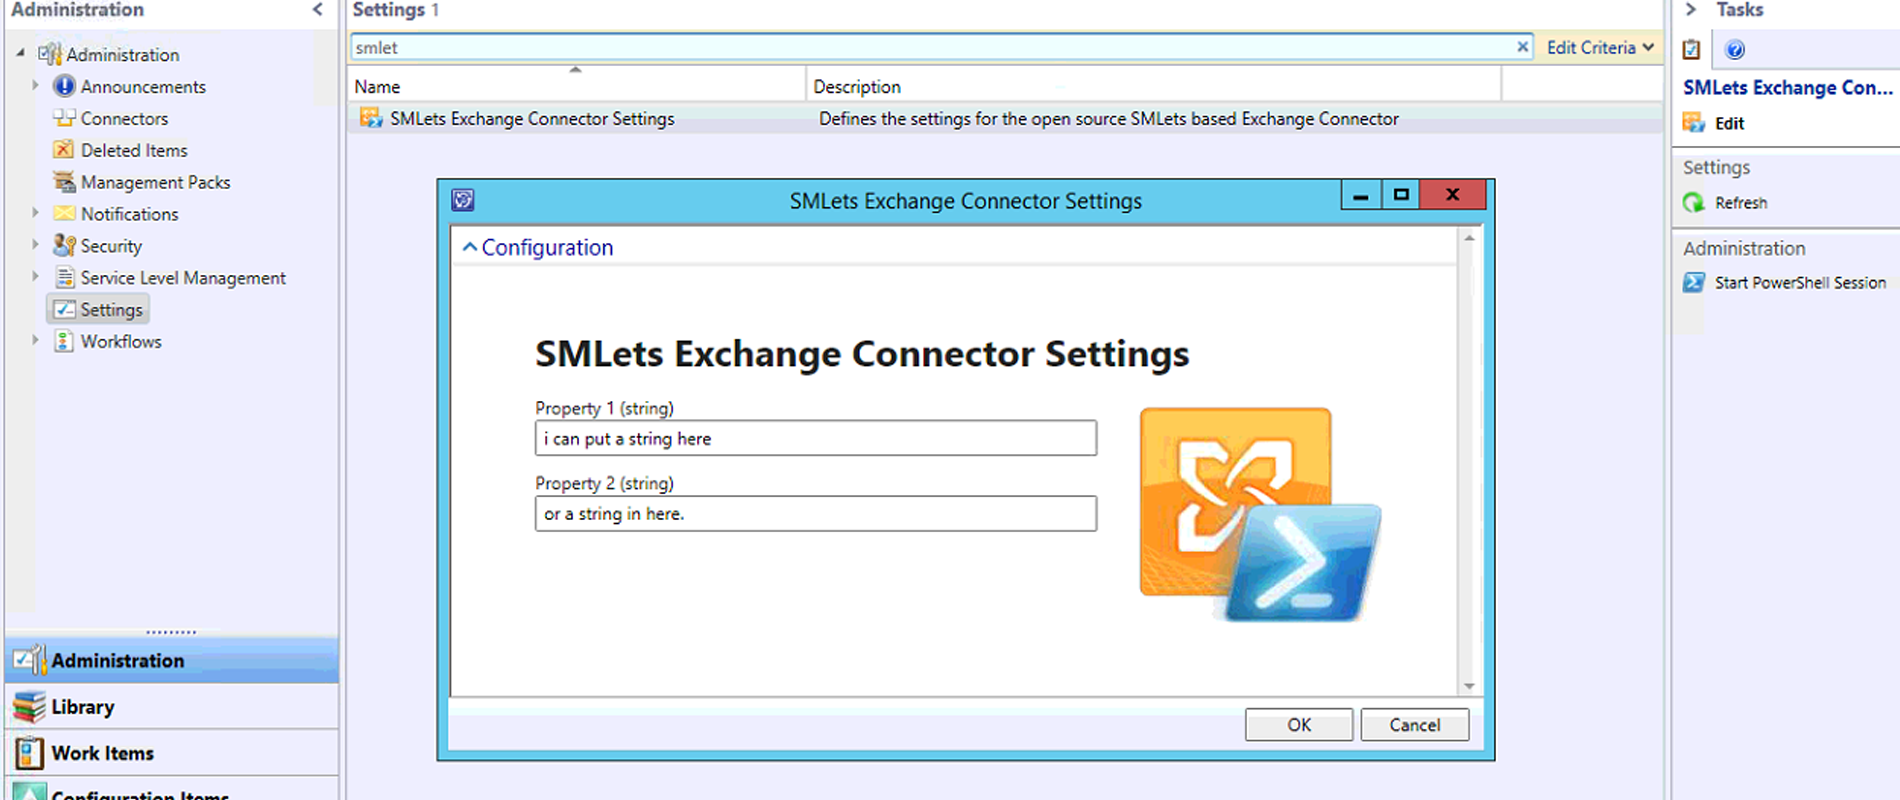
<DisplayString ElementID="SMLets.Exchange.Connector">
<Name>SMLets Exchange Connector</Name>
<Description>Provides centralized, persistent settings for the Powershell based SMLets Exchange Connector</Description>
</DisplayString>
<DisplayString ElementID="SMLets.Exchange.Connector.AdminSettings.Definitions">
<Name>SMLets Exchange Connector Settings</Name>
<Description>Defines the settings for the open source SMLets based Exchange Connector</Description>
</DisplayString>
<DisplayString ElementID="SMLets.Exchange.Connector.AdminSettings.Edit">
<Name>Edit</Name>
<Description>View or edit the settings for the open source SMLets based Exchange Connector</Description>
</DisplayString>
</DisplayStrings>
<KnowledgeArticles></KnowledgeArticles>
</LanguagePack>
</LanguagePacks>
But what does this above secion do to our management pack and what does it look like now?
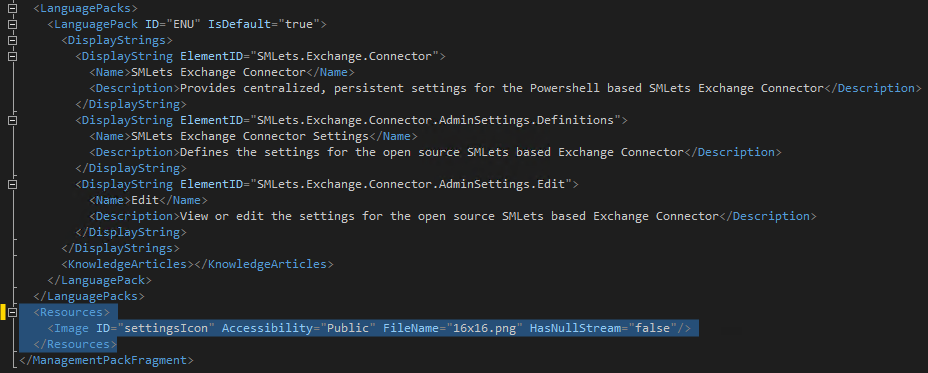
Alright, last but not least let’s reference the images/icons we want to use in our MP with the new Resources section so the MP knows where to find them.
<Resources>
  <Image ID="settingsIcon" Accessibility="Public" FileName="nameOfYourPictureInTheImagesFolder.png" HasNullStream="false"/>
</Resources>
Once again, where does this new Resources section go? Almost right at the very end of the management pack.
Now if we did absolutely nothing more at this point, we’d have management pack fragments that Visual Studio would combine together, to create a single raw XML file. Then using the keypair we created, it would be converted into the binary MP file we could take into SCSM with us and have a class with two properties we could set values for. We could then use the following SMLets PowerShell to query for the class and retrieve said properties.
$props = ((Get-SCSMObject -Class (get-scsmclass -name "SMLets.Exchange.Connector.AdminSettings.Definitions$")))
$props | select-object *
We could go one step further and even set those properties with SMLets
Set-SCSMObject -SMObject $props -Property Property1 -Value "this the value of property 1"
Set-SCSMObject -SMObject $props -Property Property2 -Value "this the value of property 2"
We now have a custom place to store settings that persist back to the SCSM database through a custom developed management pack. Not to mention, you can set them through PowerShell with SMlets.
This marks the half way point of this management pack build process in that we have the core of this thing defined and can set some properties on it through PowerShell. Part 2 covering the what, where, and how Travis gets us there through WPF, XAML, and C# can be viewed here.
If this has been helpful to you so far, Follow the repo for updates or give a Star.