

I hope you’ve had time to digest Part 1 because it’s time for Part 2 which will wrap this management pack of ours up by including a custom UI that can surface our MP’s respective properties. At the time of this exact original publish date, I still HAVE NOT published the Visual Studio solution onto a new Settings branch within the SMLets Exchange Connector repo. Links on this post will be updated to the repo accordingly once this has been done.
When we last left Travis:
That’s it for the management pack. Now let’s take a look at the form – it’s really easy. All I did was add a new WPF User Control to my project and then changed it to derive from wpfwiz:WizardRegularPageBase.
We then immediately jump right back into code, this time of the XAML nature. Where does this code go? Time to create a New Project within our existing Visual Studio Solution. Just right click on the solution (top most element) in the Solution explorer. Then head over to Add and then New Project.
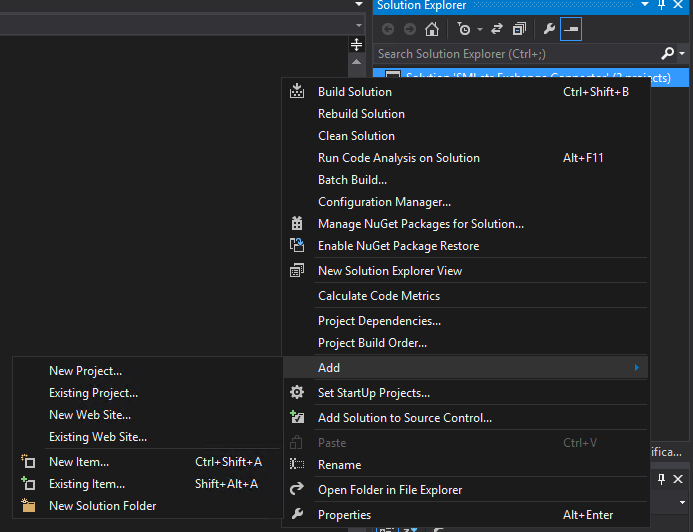
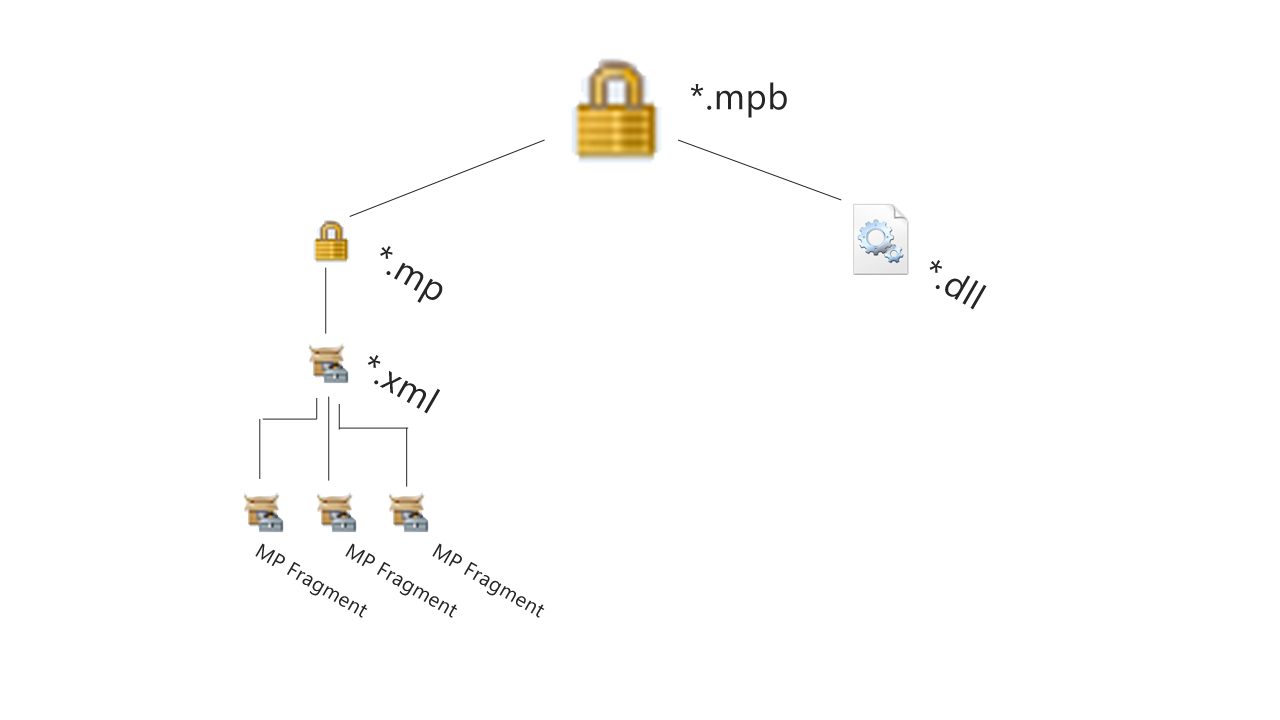
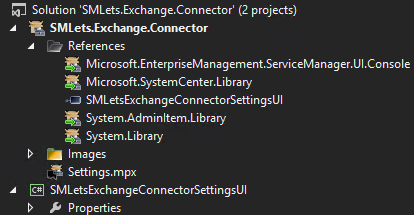
Think on what we’re doing here for a bit - we have a single Visual Studio Solution with two wholly seperate projects underneath it. One is the management pack and the other is this new project that is the DLL portion from my original MP diagram in the previous post as seen below.
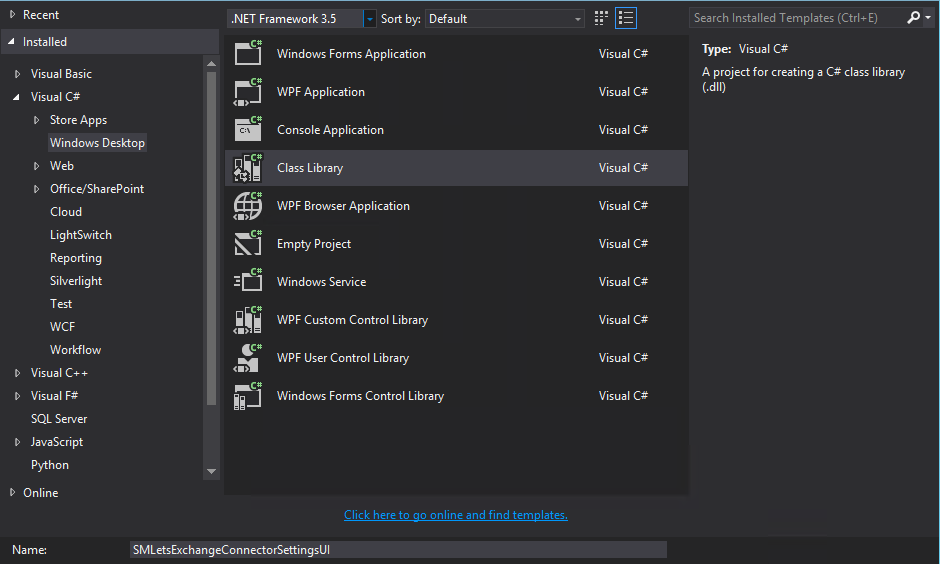
We’ll create a project of the Windows Desktop and Class Library variety that targets .NET 3.5 for SCSM 2012 R2.
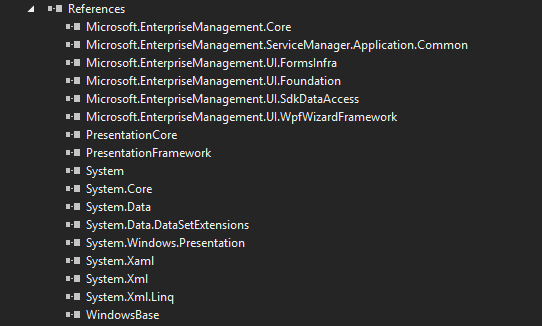
Now before we can even start constructing this thing, we’re going to need to leverage some already existing Microsoft assemblies (*.dll). This is similar to the MP references we made in part 1, but now we’re going to be referencing other DLL files instead of other MP files. We’ll need to make sure our new project has references for the following items. You’ll notice that not all of these exist on your default expansion of the References section. Namely things like Microsoft.EnterpriseManagement.* Where are they? You can find all of them in the Service Manager installation directory AND the Service Manager Authoring tool installation directory. And let me assure you, they are all there. Really really. They are incredibly easy to overlook given their similar naming but I assure you they are all definitely there!
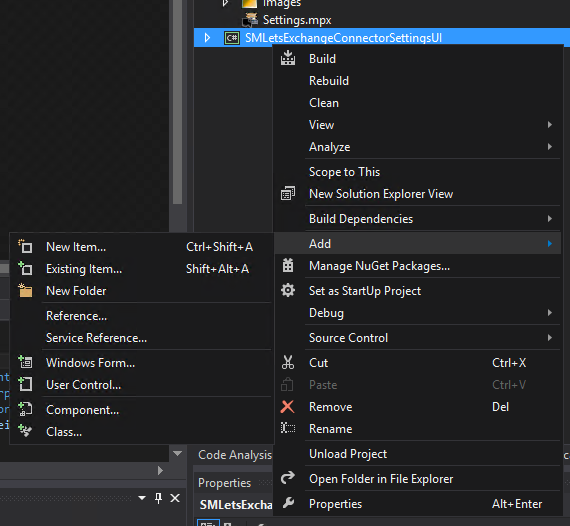
Alright, we have what we need now to actually move forward on Travis’ post. Let’s right click on the C#/DLL project we’ve created and Add a New Item of the User Control (WPF) type.
This is going to be the actual UI we see when we double click on it or hit the Edit button. So I’m going to call this AdminSettingsForm.xaml

It’s now with this brand new form of ours we can finally make use of the wpfwiz:WizardRegularPageBase code Travis is talking about. Once again, I’ve taken the liberty of getting this copy and paste ready and making some alterations to get it ready for the Settings MP we’re building.
<wpfwiz:WizardRegularPageBase x:Class="SMLetsExchangeConnectorSettingsUI.AdminSettingsForm"
            xmlns="http://schemas.microsoft.com/winfx/2006/xaml/presentation"
            xmlns:x="http://schemas.microsoft.com/winfx/2006/xaml"
            xmlns:wpfwiz="clr-namespace:Microsoft.EnterpriseManagement.UI.WpfWizardFramework;assembly=Microsoft.EnterpriseManagement.UI.WpfWizardFramework"
            xmlns:smcontrols="clr-namespace:Microsoft.EnterpriseManagement.UI.WpfControls;assembly=Microsoft.EnterpriseManagement.UI.SmControls"
            xmlns:d="http://schemas.microsoft.com/expression/blend/2008" xmlns:mc="http://schemas.openxmlformats.org/markup-compatibility/2006"
            xmlns:Custom="http://schemas.microsoft.com/SystemCenter/Common/UI/Wpf" mc:Ignorable="d" Width="630" Height="409">

    <Grid Name="ConfigurationGrid" Margin="15,25,15,10">
        <ScrollViewer Name="scrollViewer" CanContentScroll="True" VerticalScrollBarVisibility="Auto" HorizontalAlignment="Left" Width="388" Margin="0,58,0,0" Height="294" VerticalAlignment="Top">
            <StackPanel Name="stackPanel" Orientation="Vertical" Height="281.5">
                <Label Height="25" Padding="0" Margin="0,0,0,0" x:Name="datafilepathLabel_Copy" Content="Property1"/>
                <TextBox Height="25" Margin="0,-8,0,10" Name="Property1TextBlock">
                    <TextBox.Text>
                        <Binding Path="Property1" Mode="TwoWay" FallbackValue=""/>
                    </TextBox.Text>
                </TextBox>
                <Label Height="25" Padding="0" Margin="0,0,0,0" x:Name="datafilepathLabel_Copy1" Content="Property2"/>
                <TextBox Height="25" Margin="0,-8,0,10" Name="Property2TextBlock" >
                    <TextBox.Text>
                        <Binding Path="Property2" Mode="TwoWay" FallbackValue=""/>
                    </TextBox.Text>
                </TextBox>
            </StackPanel>
        </ScrollViewer>
               <Label Content="SMLets Exchange Connector Settings" Margin="0,10,10,0" VerticalAlignment="Top" Height="48" FontWeight="Bold" FontSize="26"/>

    </Grid>
</wpfwiz:WizardRegularPageBase>
This above somewhat HTML-ish looking code is known as XAML and serves the purpose of building a UI separate from the actual code and logic behind the scenes. Take note of the first line and what Travis highlights as “deriving from”:
<wpfwiz:WizardRegularPageBase x:Class="SMLetsExchangeConnectorSettingsUI.AdminSettingsForm">
While you easily could overlook this as the class name of the XAML form/UI, make a mental note of it as it’s going to come in handy later for our code behind file which we’ll get to next. Now the thing is there really isn’t much to explain here about the above XAML file because if you wanted you could just use Visual Studio to drag ‘n drop, re-arrange elements, etc. without having to touch this (apart from the section we need to have there per Travis about wpfwiz:WizardRegularPageBase). You can even use the properties pane in the lower right hand corner to make fine adjustments that will in turn automatically update this text for you. But of course you can always edit by hand and make even finer adjustments yourself if you prefer not to use the UI tools. If it feels anything like the SCSM Authoring Tool it’s because the Authoring Tool is based off of Visual Studio and the VSAE.
Travis then goes onto say:
There is a very small amount of code behind that we need to put into the .cs file that is associated with this .xaml file. You’ll see that this implementation is very similar to the task handler provided in the CSV Connector example. We are using the same concept of a “Wizard” in property page mode to display the UI to get/set the property values.
Getting to the code-behind for our GUI is as simple as expanding the XAML file in the Solution Explorer to view and edit the code-behind file. This code-behind file will help further define some properties about this new UI of ours.

However the code Travis lays out can’t just be taken for a direct copy and paste. It once again is part of a larger picture that looks like the following and belongs in AdminSettingsForm.xaml.cs -
using System;
using System.Collections.Generic;
using System.Linq;
using System.Text;
using System.Windows;
using System.Windows.Controls;
using System.Windows.Data;
using System.Windows.Documents;
using System.Windows.Input;
using System.Windows.Media;
using System.Windows.Media.Imaging;
using System.Windows.Navigation;
using System.Windows.Shapes;
using Microsoft.EnterpriseManagement.UI.WpfWizardFramework;
using Microsoft.EnterpriseManagement.UI.DataModel;
using Microsoft.EnterpriseManagement.UI;

namespace SMLetsExchangeConnectorSettingsUI
{
    /// <summary>
    /// Interaction logic for SettingsUI.xaml
    /// </summary>

    public partial class AdminSettingsForm : WizardRegularPageBase
    {
        private AdminSettingsForm adminSettingWizardData = null;

        public AdminSettingsForm(WizardData wizardData)
        {
            InitializeComponent();
            this.DataContext = wizardData;
            this.adminSettingWizardData = this.DataContext as AdminSettingsForm;
        }

        private void WizardRegularPageBase_Loaded(object sender, RoutedEventArgs e)
        {

        }
    }
}
Travis continues:
This code simply binds the WizardData object to the form as part of the constructor. Now let’s look at the task handler code and associated WizardData class. The only tricky/new part of this is highlighted below in the code comments.
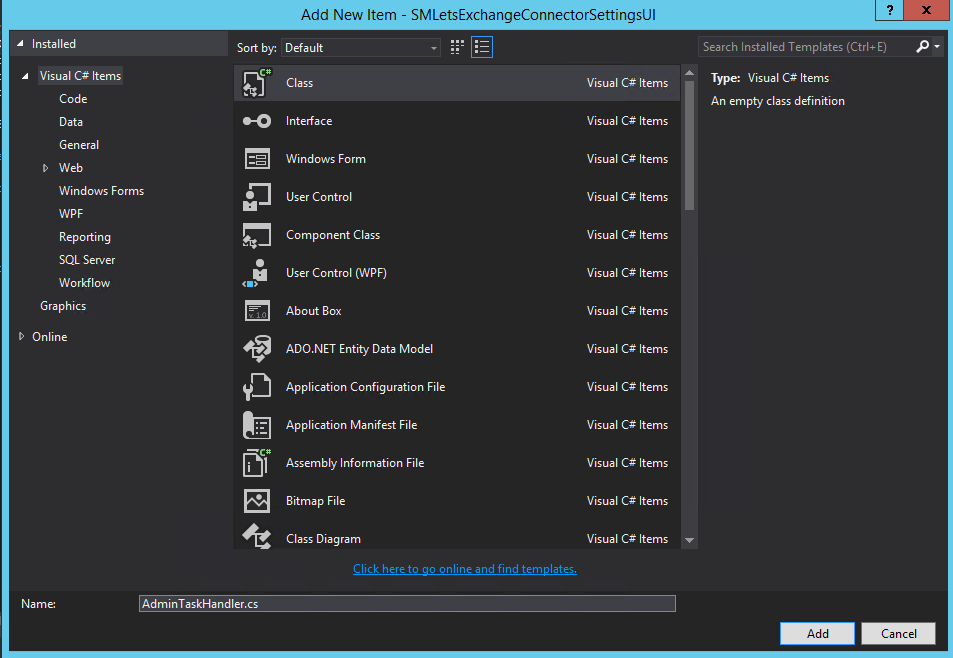
Now it’s this next file/block of code that he is referencing is what we will need to create the actual click event. This is the code that is going to call the XAML UI we just built above. Let’s right click on the SMLetsExchangeConnectorSettingsUI project we’ve created in this post and Add a New Item of the Class type. We’re going to call it AdminTaskHandler.cs if you’re paying close attention or you have post 1 open in another tab this name may look a rather familiar from Post 1’s MP XML as cited directly below. The XML below from post 1 instructs SCSM how to actually look up and load the DLL we’re currently building in post 2.
<Presentation>
  <ConsoleTasks>
    <ConsoleTask ID="SMLets.Exchange.Connector.AdminSettings.Edit" Accessibility="Public" Enabled="true" Target="SMLets.Exchange.Connector.AdminSettings.Definitions" RequireOutput="false">
      <Assembly>Console!SdkDataAccessAssembly</Assembly>
      <Handler>Microsoft.EnterpriseManagement.UI.SdkDataAccess.ConsoleTaskHandler</Handler>
      <Parameters>
        <Argument Name="Assembly">SMLetsExchangeConnectorSettingsUI</Argument>
        <Argument Name="Type">SMLetsExchangeConnectorSettingsUI.AdminTaskHandler</Argument>
      </Parameters>
    </ConsoleTask>
  </ConsoleTasks>
</Presentation>
Enough call backs to the previous post. Let’s get back to our brand new AdminTaskHandler.cs file we’ve just created and the larger block of code that contains what Travis refers to as “the tricky part”. What we’ll need to put inside of AdminTaskHandler.cs is the following:
using System;
using System.Collections;
using System.Collections.Generic;
using System.Linq;
using System.Text;
using System.Threading;
using System.Windows.Threading;
using System.Windows;
using Microsoft.EnterpriseManagement;
using Microsoft.EnterpriseManagement.Common;
using Microsoft.EnterpriseManagement.ConnectorFramework;
using Microsoft.EnterpriseManagement.ConsoleFramework;
using Microsoft.EnterpriseManagement.UI.SdkDataAccess;
using Microsoft.EnterpriseManagement.UI.DataModel;
using Microsoft.EnterpriseManagement.UI.WpfWizardFramework;
using Microsoft.EnterpriseManagement.UI.SdkDataAccess.DataAdapters;
using Microsoft.EnterpriseManagement.UI.FormsInfra;
using Microsoft.EnterpriseManagement.UI.Extensions.Shared;
using Microsoft.EnterpriseManagement.GenericForm;
using Microsoft.EnterpriseManagement.Configuration;
using Microsoft.Win32;

namespace SMLetsExchangeConnectorSettingsUI
{
    internal class AdminTaskHandler : ConsoleCommand
    {
        public AdminTaskHandler()
        {

        }

        public override void ExecuteCommand(IList<NavigationModelNodeBase> nodes, NavigationModelNodeTask task, ICollection<string> parameters)
        {
            /*
            This GUID is generated automatically when you import the Management Pack with the singleton admin setting class in it.
            You can get this GUID by running a query like:
            Select BaseManagedEntityID, FullName where FullName like ‘%<enter your class ID here>%’
            where the GUID you want is returned in the BaseManagedEntityID column in the result set
            */
            /*In this above example I imported the MP, and then used:
                Select BaseManagedEntityID, FullName
                From BaseManagedEntity
                where FullName like 'SMLets%'
              against the ServiceManager DB to figure out the following strSingletonBaseManagedObjectID
             */

            String strSingletonBaseManagedObjectID = "6FFB0179-D405-DCCB-FC28-59845DC4A4BA";

            //Get the server name to connect to and connect to the server
            String strServerName = Registry.GetValue("HKEY_CURRENT_USER\\Software\\Microsoft\\System Center\\2010\\Service Manager\\Console\\User Settings", "SDKServiceMachine", "localhost").ToString();
            EnterpriseManagementGroup emg = new EnterpriseManagementGroup(strServerName);

            //Get the Object using the GUID from above – since this is a singleton object we can get it by GUID
            EnterpriseManagementObject emoAdminSetting = emg.EntityObjects.GetObject<EnterpriseManagementObject>(new Guid(strSingletonBaseManagedObjectID), ObjectQueryOptions.Default);

            //Create a new "wizard" (also used for property dialogs as in this case), set the title bar, create the data, and add the pages
            WizardStory wizard = new WizardStory();
            wizard.WizardWindowTitle = "SMLets Exchange Connector Settings";
            WizardData data = new AdminSettingWizardData(emoAdminSetting);
            wizard.WizardData = data;
            wizard.AddLast(new WizardStep("General", typeof(AdminSettingsForm), wizard.WizardData));

            //Show the property page
            PropertySheetDialog wizardWindow = new PropertySheetDialog(wizard);

            //Update the view when done so the new values are shown
            bool? dialogResult = wizardWindow.ShowDialog();
            if (dialogResult.HasValue && dialogResult.Value)
            {
                RequestViewRefresh();
            }
        }
    }
}
There is a lot happening above. So let’s break it down:
- We’re retrieving the BaseManagedEntityID which is attainable after importing the signed MP and using the aforementioned SQL query against the ServiceManager db
- Retrieving the management server name through registry
- We’re creating what’s known as a Wizard Story. In short - the friendly UIs you see when you open one of the other Settings panes. At length - A Wizard Story consists of one or many Wizard Steps. A Wizard Step represents a single configuration page. A Wizard Step in this case is our brand new AdminSettingsForm UI (and this is where the name of the form I said would come in handy) and adding it into the Wizard Story through the “typeof” bit:
wizard.AddLast(new WizardStep("General", typeof(AdminSettingsForm), wizard.WizardData));
-
- If you’re familar with PowerShell, think of this like adding items into an array. The items (or Wizard Steps in this case) are an individual Form UI and the array is the Wizard Story. Next, if you’re wondering why you’d have more than one page/UI look no further than “Incident Settings” in the Admin Settings pane in the SCSM console. You open this single window but it has multiple configuration pages and/or sections that collapse and expand as you select them. This UI styling is made possible by Wizard Story and Wizard Step. Adding more Wizard Steps is as simple as just adding more of those lines seen directly above for wizard.AddLast()
- Once we’ve added all of our Wizard Steps into our Wizard Story we will show that UI
- While it isn’t defined anywhere in the entire solution, the UI will automatically feature an OK and Cancel button that intuitively understands those concepts
I also want to touch on the first point above in greater detail. Travis points it out in the middle of his code as the “tricky part”, I’ve kept in my code, and it’s worth emphasizing here again.
/*
This GUID is generated automatically when you import the Management Pack with the singleton admin setting class in it.
You can get this GUID by running a query like:
Select BaseManagedEntityID, FullName where FullName like ‘%<enter your class ID here>%’
where the GUID you want is returned in the BaseManagedEntityID column in the result set
*/
/*In this above example I imported the MP, and then used:
    Select BaseManagedEntityID, FullName
    From BaseManagedEntity
    where FullName like 'SMLets%'
    against the ServiceManager DB to figure out the following strSingletonBaseManagedObjectID
    */
String strSingletonBaseManagedObjectID = "6FFB0179-D405-DCCB-FC28-59845DC4A4BA";
This is another incredibly fundamental step much like the Public Key Token in part 1. Which means you’ll have to have imported the signed MP so you can even run the SQL query against your ServiceManager DB to return a value. That returned value (i.e. a GUID) is what you’ll want to set this strSingletonBaseManagedObjectID value to.
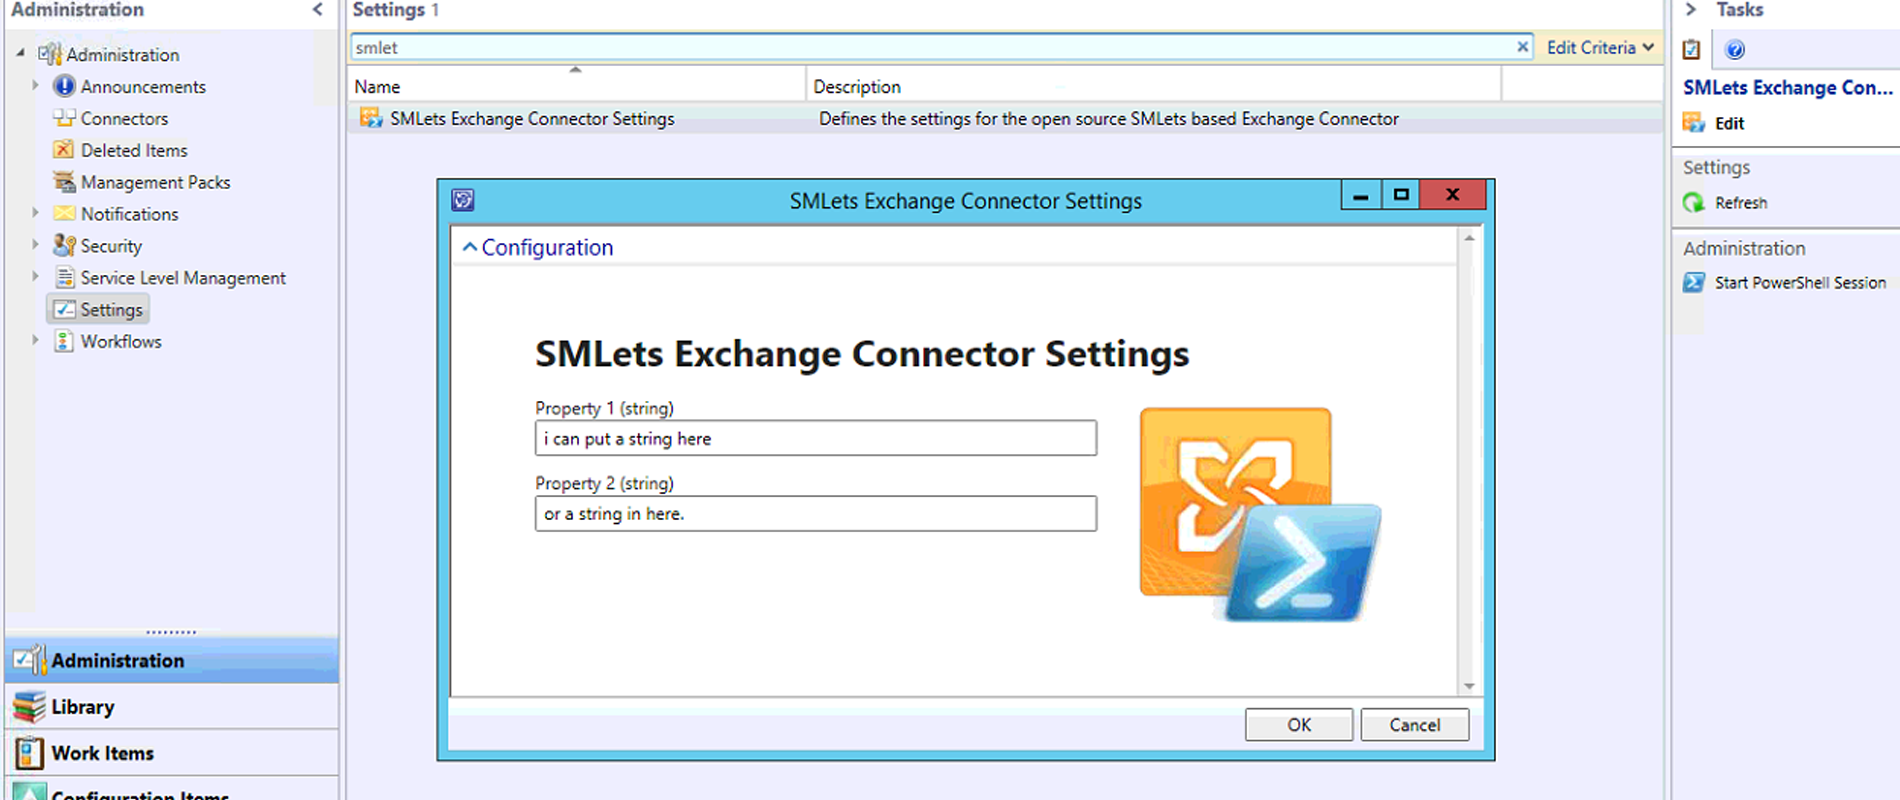
At this point we’ve built the management pack, we’ve built the UI, we’ve built the click event that loads that UI, we have two more steps and up next is when the UI is opened it should load the stored values in the MP as well as save new ones that we update in the UI that is called. We’re in the home stretch, just one last file to create.
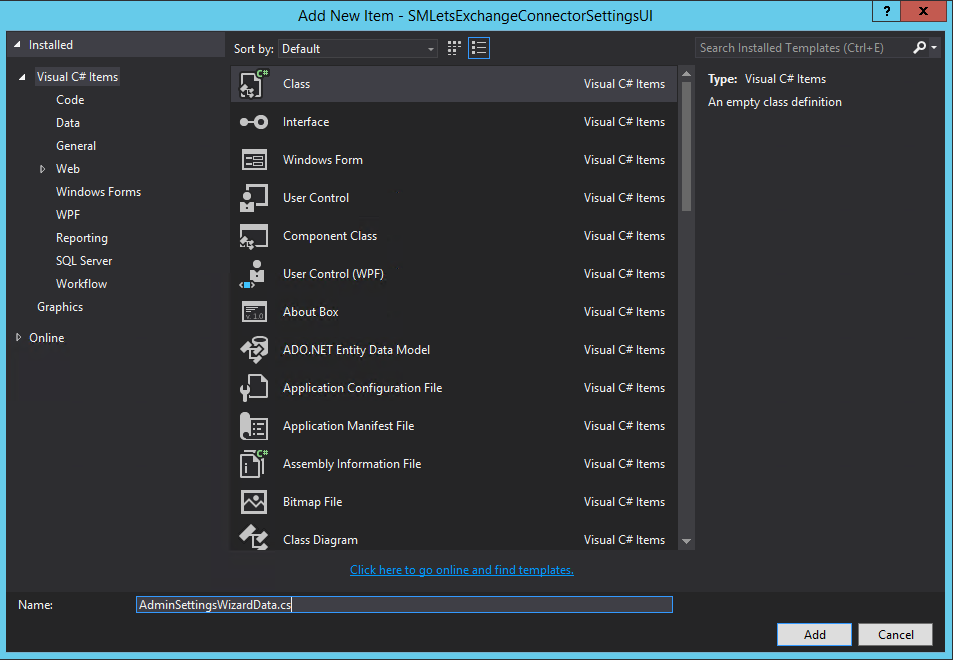
Let’s right click on our SMLetsExchangeConnectorSettingsUI project and create a new Class by the name of AdminSettingWizardData.cs
This block of code is going to be responsible for loading and saving data from the Wizard Story/Steps (hence the name). What we need to place in this file doesn’t have an obvious seperation in Travis’ original post. Make no mistake, it is absolutley there. But you could easily overlook it as the previous section we just went over bleeds directly into what we need below per his post. The code is part of a larger picture seen below in our new AdminSettingWizardData.cs file.
using System;
using System.Collections.Generic;
using System.Linq;
using System.Text;
using Microsoft.EnterpriseManagement.UI.WpfWizardFramework;
using System.ComponentModel;
using Microsoft.EnterpriseManagement.UI.DataModel;
using Microsoft.EnterpriseManagement.Common;
using Microsoft.EnterpriseManagement;
using Microsoft.EnterpriseManagement.Configuration;
using Microsoft.Win32;

namespace SMLetsExchangeConnectorSettingsUI
{
    class AdminSettingWizardData : WizardData
    {
        #region Variables
        private String strProperty1 = String.Empty;
        private String strProperty2 = String.Empty;
        private Guid guidEnterpriseManagementObjectID = Guid.Empty;

        public String Property1
        {
            get
            {
                return this.strProperty1;
            }
            set
            {
                if (this.strProperty1 != value)
                {
                    this.strProperty1 = value;
                }
            }
        }

        public String Property2
        {
            get
            {
                return this.strProperty2;
            }
            set
            {
                if (this.strProperty2 != value)
                {
                    this.strProperty2 = value;
                }
            }
        }

        public Guid EnterpriseManagementObjectID
        {
            get
            {
                return this.guidEnterpriseManagementObjectID;
            }
            set
            {
                if (this.guidEnterpriseManagementObjectID != value)
                {
                    this.guidEnterpriseManagementObjectID = value;
                }
            }
        }
        #endregion

        //load the currently defined settings in the management pack
        internal AdminSettingWizardData(EnterpriseManagementObject emoAdminSetting)
        {
            //Get the server name to connect to and then connect
            String strServerName = Registry.GetValue("HKEY_CURRENT_USER\\Software\\Microsoft\\System Center\\2010\\Service Manager\\Console\\User Settings", "SDKServiceMachine", "localhost").ToString();
            EnterpriseManagementGroup emg = new EnterpriseManagementGroup(strServerName);

            //Get the AdminSettings MP so you can then get the Admin Setting class
            ManagementPackClass smletsExchangeConnectorSettingsClass = emg.EntityTypes.GetClass(new Guid("6FFB0179-D405-DCCB-FC28-59845DC4A4BA"));
            this.Property1 = emoAdminSetting[smletsExchangeConnectorSettingsClass, "Property1"].ToString();
            this.Property2 = emoAdminSetting[smletsExchangeConnectorSettingsClass, "Property2"].ToString();
            this.EnterpriseManagementObjectID = emoAdminSetting.Id;
        }

        //save the values back to the management pack
        public override void AcceptChanges(WizardMode wizardMode)
        {
            //Get the server name to connect to and connect
            String strServerName = Registry.GetValue("HKEY_CURRENT_USER\\Software\\Microsoft\\System Center\\2010\\Service Manager\\Console\\User Settings", "SDKServiceMachine", "localhost").ToString();
            EnterpriseManagementGroup emg = new EnterpriseManagementGroup(strServerName);
            ManagementPackClass smletsExchangeConnectorSettingsClass = emg.EntityTypes.GetClass(new Guid("6FFB0179-D405-DCCB-FC28-59845DC4A4BA"));

            //Get the Connector object using the object ID
            EnterpriseManagementObject emoAdminSetting = emg.EntityObjects.GetObject<EnterpriseManagementObject>(this.EnterpriseManagementObjectID, ObjectQueryOptions.Default);

            //Set the property values to the new values
            emoAdminSetting[smletsExchangeConnectorSettingsClass, "Property1"].Value = this.Property1;
            emoAdminSetting[smletsExchangeConnectorSettingsClass, "Property2"].Value = this.Property2;

            //Update the MP
            emoAdminSetting.Commit();
            this.WizardResult = WizardResult.Success;
        }
    }
}
As you can see above we:
- Created some variables to hold settings in memory
- Have two distinct actions AdminSettingWizardData which does our MP data load when the UI is opened and AcceptChanges which saves the data that was in the UI back into the MP
- Changed how the management pack class is identified. If you look closely you’ll notice one very tiny difference. I can’t seem to get the sytax that identifies an MP by it’s Name to work in my solution. A shame because it seems infinitley more convenient than retrieving it by GUID. Then again, not exactly a big deal given we know the GUID by virtue of the aforementioned SQL query.
ManagementPackClass classAdminSetting = mpAdminSetting.GetClass("Microsoft.Demo.AdminSetting.Example");
If you’ve been following along and don’t have any copy and paste issues, right click the your SMLetsExchangeConnectorSettingsUI project and click “Build”. Fingers crossed and you should successfully be able to build this DLL file. Because it is now onto the very, last, step.
Now that we’ve built the DLL file that contains all of the UI elements, we need to add said DLL as a Reference back on our original MP project from the 1st post similar to how we added images as references. In the following screenshot you can see we have the single solution, with the two projects we’ve been working with. Let’s expand the Reference section out within the Settings Management Pack Fragment and add a new reference. Next, you’ll need to browse over to the folder path that contains the assembly we’ve just built above.
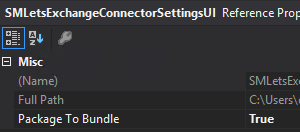
Once you’ve done it, just like the pictures from the first post we need to make sure the DLL gets wrapped up alongside the MP to form our MPB. This is a very similar change to embedding pictures as resources. A little different for DLLs for sure but the same concept applies.
Finally let’s go back to the Settings MP Fragment. At the very bottom in the Resources section we’re going to want to make sure our MP knows how to call our assembly/DLL file just like how it knows how to call our images.
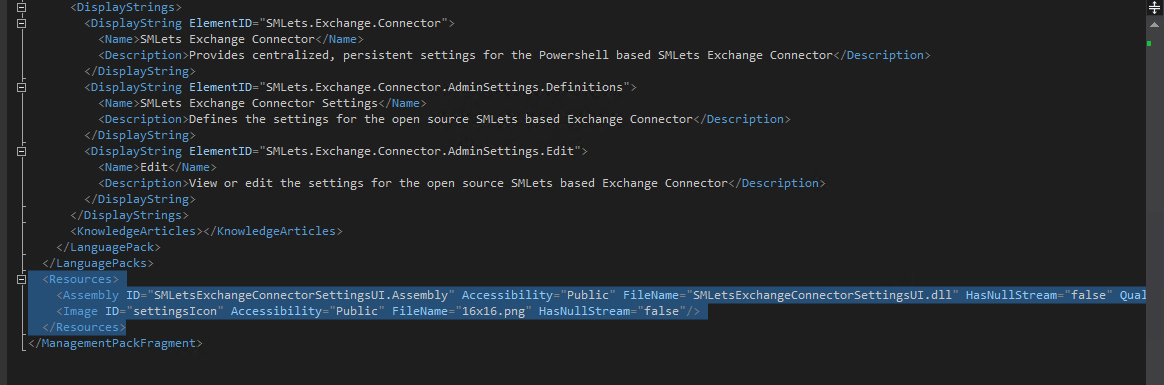
You can copy and paste the following which includes the Image we originally added in Part 1 and now introduces the reference to our DLL we created here in Part 2.
  <Resources>
    <Assembly ID="SMLetsExchangeConnectorSettingsUI.Assembly" Accessibility="Public" FileName="SMLetsExchangeConnectorSettingsUI.dll" HasNullStream="false" QualifiedName="SMLetsExchangeConnectorSettingsUI, Version=1.0.0.0, Culture=neutral" />
    <Image ID="settingsIcon" Accessibility="Public" FileName="16x16.png" HasNullStream="false"/>
  </Resources>
If you haven’t already, now would be a great time to hit the green Start button. Visual Studio will gather all the parts of your project, assemble them, and hopefully create the final MPB file for deployment. Assuming all goes well, there is only one thing left to do:
Celebrate!
In closing:
There is a lot of work ahead on this Settings MP as the SMLets Exchange Connector has grown significantly in terms of configurations options so there are a lot of UIs (XAML forms/Wizard Steps) to build, test, validate inputs on, etc. Once published, I’ll update links here and if neccesary touch up the posts to further ensure accuracy.
This two part series is once again made possible by Travis Wright’s original post and his other beyond useful related TechNet articles. While this series serves as a primer, once published - you can get involved in the ongoing development of the Settings MP in the GitHub repo for the SMLets Exchange Connector. A project that seeks to replace the stock Microsoft Exchange Connector for System Center Service Manager by introducing an open source PowerShell alternative driven by SMLets. Adding over 20 new features such Cireson Portal integration, SCOM integration, Artificial Intelligence through Azure Cognitive Services, and above all else enabling SCSM Administrators everywhere to further customize the solution to their needs through PowerShell.
If this has been helpful to you; Follow the repo for updates or give a Star.